One thing we’ve never had on any of our campuses is outdoor wireless. Last year I had the opportunity to make this happen. We chose the upper campus Quad as this is a very well used and high traffic area. There are a number a sitting areas scattered around where students study and staff take breaks. We also planned for spectator coverage for Wickwire field. This is our sports field that includes an outdoor scoreboard and concrete stands which seat up to 1200.
Google maps made design the designing easier than the usual trying to get accurate floor plans from someone. Just needed a screenshot, loaded this into Ekahau, went outside to get the length of one of the building walls, used this to set the scale and then the design was underway. Now, since this time I have found out an even better trick. You can actually measure building walls in Google and Bing maps! I use this regularly in scaling all my floor plans when I can’t be onsite right away. I mention Bing maps (who knew that was still around) because Scott McDermott had pointed out during an ECSE course, that the bird’s eye view in Bing maps does the best job.
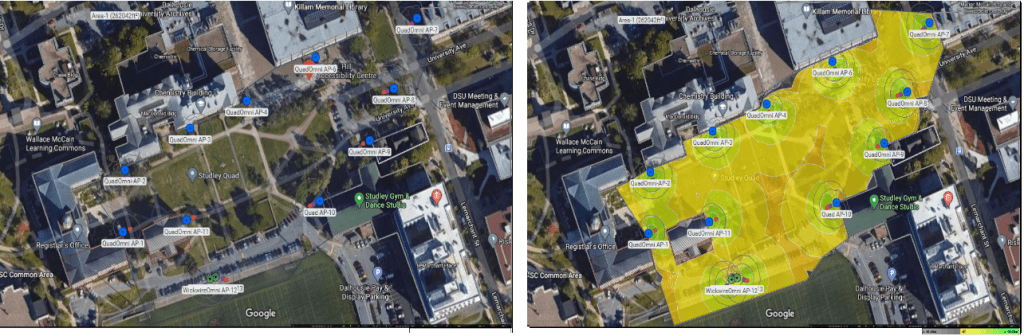
The next part of the design process was actually going out and walking the planned sites. This provided better information on obstacles (especially trees that look like bushes on google maps) that were not clearly visible from the google view. This is very important to the design process because planning and deploying a device only to find the coverage isn’t what you expected because there is a tree, large bush or other obstacle in the way is a huge waste of time and money. In the case or trees or bushes, you must also take into account how much they will grow and/or bloom in the future as well. A scraggly bunch of branches in the fall or winter may become a bountiful, leaf covered problem come spring and summer 🙂 In this case, only one AP location was found to be impacted and an alternative location was able to be found.
We also had electrical walk the sites with us to determine cable run lengths and issues that may need to be planned around or locations that may have had to be changed. We were fortunate that electrical had no major issues with any of the locations we picked.

The next hurdle was that attaching APs to buildings needed to be approved. Our buildings in this area are original and old. The decision was made to have posts installed instead of attaching directly to buildings. The design of the posts and locations then had to be approved.

Next we hired company to fabricate and install the posts. Because of the digging evolved, we also had someone do underground locates before digging began to ensure safety and no damage to any infrastructure that may have been buried.
We chose to run fiber and power line where Cat6 was not feasible due to long cable run lengths and insulated Cat6e (direct burial) to all other sites.
e For the Wickwire field, we used the large existing light post in the middle of the outdoor seating for fans and a mounting location and to provide power. Learned from Jim to stagger/separate the mounting of APs horizontally to limit the…..
As is the norm, we had purchased Cisco 1562s months before the installs began. Not long after we did the installs, these were announced as end of sale/end of life. Since the new cisco network we are having built by outside contractors had not been completed at the time, there was still no way to even activate the APs. They still have support until 2028 so lots of time to get use out of them.
As of today, our new network has still not been completed so we have not been able to turn the outdoor setup on. When this finally happens, I will do a post-deployment survey to ensure everything is operating as expected and update this post.

Leave a comment